Blendを使ってButtonのホバーエフェクトを作る
cssでボタンのホバーエフェクトを色々紹介している、以下の記事が面白かったので、WPFで真似してみました。
http://www.nxworld.net/tips/css-only-button-design-and-hover-effects.html
cssよくわからんから、なんとなーく真似してるだけですが。。。W
この手のデザイン系の作業なので、
Blendの練習を兼ねて、Blendの操作で作ってきます。
背景カラーをふわっと変更するボタン
何はともあれ、前述したリンクの1個目のボタンを作ってみます。
ボタンの基本部分の作成
WPFのプロジェクトを作って、適当にボタンを配置します。
こんな感じのコード
<Window x:Class="ButtonDesign.MainWindow"
        xmlns="http://schemas.microsoft.com/winfx/2006/xaml/presentation"
        xmlns:x="http://schemas.microsoft.com/winfx/2006/xaml"
        Title="MainWindow" Height="350" Width="525">
    <WrapPanel>
        <WrapPanel.Resources>
            <Style TargetType="{x:Type Button}">
                <Setter Property="Margin" Value="20" />
                <Setter Property="Width" Value="100" />
                <Setter Property="Height" Value="35" />
            </Style>
        </WrapPanel.Resources>
        <Button Content="Button" />
    </WrapPanel>
</Window>
BlendでControlTemplateの作成
このプロジェクトをBlendで開いて、編集を始めます。
とりあえず、コントロールテンプレートを0から作っていきます。
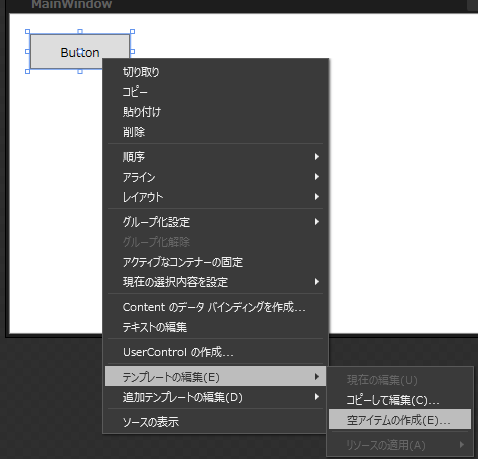
- ボタンを選択&右クリック
- テンプレートの編集⇒空アイテムの作成
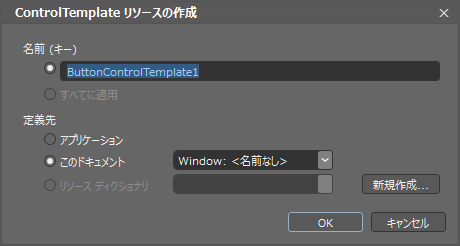
- 「ControlTemplateリソースの作成」ダイアログで、必要な項目を入力
- 名前は適当に。定義先もメンドイからこのドキュメントでいいや。
ちゃんと作るなら、定義先はApp.xamlにまとめておくとか、ちゃんとリソースディクショナリを作って管理した方がいいでしょう。
ボタンの基礎部分の作成
空のControlTemplateを適用したので、ボタンの概観が何もなくなり、実行しても何も見えなくなってしまっています。
まずは、ボタンの基礎となるデザインを作成します。
Template内のGridを選択して、レイアウトの種類をBorderに変更します。

アセットからContentPresenterを選択して、Borderの中にドロップします。
これまでに配置したコントロールに、以下のようにプロパティを設定します。
・Border
Background="#FF333333"
・ContentPresenter
TextBlock.Foreground="White"
HorizontalAlignment="Center"
VerticalAlignment="Center"
マウスオーバー時の動作などは何も書いてないので、実行してマウスカーソルを持ってきても何も変化しません。
ここまでのxamlはこんな感じ。
    <Window.Resources>
        <ControlTemplate x:Key="ButtonControlTemplate1" TargetType="{x:Type Button}">
            <Border Background="#FF333333">
                <ContentPresenter TextBlock.Foreground="#FFFFFFFF" HorizontalAlignment="Center" VerticalAlignment="Center"/>
            </Border>
        </ControlTemplate>
    </Window.Resources>
    <WrapPanel>
		<WrapPanel.Resources>
			<Style TargetType="{x:Type Button}">
				<Setter Property="Margin" Value="20" />
				<Setter Property="Width" Value="100" />
				<Setter Property="Height" Value="40" />
			</Style>
		</WrapPanel.Resources>
        <Button Content="Button" Template="{DynamicResource ButtonControlTemplate1}"/>
    </WrapPanel>
VisualStateの定義
ここからマウスオーバー時の動作を記述していきます。
マウスオーバー時に、見た目を変化させる方法は、何通りかの方法があります。
- トリガーを使う
- VisualStateManagerで状態を定義していく
今回は、VSMを使ってマウスオーバー時の動作を書いてみたいと思います。
ここから先の作業は、Blendの画面をアニメーション編集向けのレイアウトに変更しておくと便利だと思います。Blendの画面レイアウトは、Ctrl+F11で切り替えることができます。
- 画面左下の状態タブを開いて、MouseOverをクリック
- xamlデザイナ部分の周辺が、赤枠で囲まれます
- オブジェクトとタイムラインのタブで、タイムライン表示を開く
- タイムラインが表示されていない場合は、「タイムラインを表示する」ボタンを押す
- Borderのオブジェクトを選択して、以下の設定をする
- タイムライン上で黄色の線を0:00:0.300まで移動
- Backgroundプロパティを、#FF59b1ebに変更
- アニメーションのイージングを設定
- オブジェクトとタイムラインタブで、Backgroundを選択
- EasingFunctionで、Cubin InOutを選択
これで実行すると、ボタン上にカーソルを持ってきたときに、ふわっと色が変わります。
元の状態に戻るときのアニメーション
このままだと、カーソルがボタン外に行ったときに、元の色に急に戻ってしまうので、元の状態に戻すアニメーションの設定をします。
- 状態タブで、Normalを選択
- オブジェクトでborderを選択して、0:00:0.300の時間で、Backgroundを#FF333333に設定する
- このとき、#FF333333の値は、アニメーションしない初期の状態と同じ色のため、GUIから直接設定できない。
- ⇒一度別の色を設定してから、#FF333333に戻すと、この設定にできます。
- MouseOvertと同様に、EasingFunctionで、Cubin InOutを選択
ボタンを押した時のアニメーションを追加
参考にしたcssの記事で行っているデザインは、以上で再現できました。
でも、これを実行してボタンをクリックすると、また最初の黒いデザインに戻ってしまいます。
今度は、マウスを押した時のアニメーション動作を作ってみます。
マウスを押したら、少し暗めの色にするアニメーションを追加してみます。
- 状態タブで、Pressdを選択
- オブジェクトでborderを選択して、以下の設定を行う
- タイムライン上で黄色の線を0:00:0.300まで移動
- Backgroundプロパティを、#FF59b1ebに変更
- MouseOvertと同様に、EasingFunctionで、Cubin InOutを選択
出来上がったボタンの動作はこんな感じ。
コードは、以下の通りです。
コード
<Window x:Class="ButtonDesign.MainWindow"
        xmlns="http://schemas.microsoft.com/winfx/2006/xaml/presentation"
        xmlns:x="http://schemas.microsoft.com/winfx/2006/xaml"
        Title="MainWindow" Height="350" Width="525">
    <Window.Resources>
        <ControlTemplate x:Key="ButtonControlTemplate1" TargetType="{x:Type Button}">
            <Border x:Name="border" Background="#FF333333">
                <VisualStateManager.VisualStateGroups>
                    <VisualStateGroup x:Name="CommonStates">
                        <VisualState x:Name="Normal">
                            <Storyboard>
                                <ColorAnimationUsingKeyFrames Storyboard.TargetProperty="(Panel.Background).(SolidColorBrush.Color)" Storyboard.TargetName="border">
                                    <EasingColorKeyFrame KeyTime="0:0:0.3" Value="#FF333333">
                                        <EasingColorKeyFrame.EasingFunction>
                                            <CubicEase EasingMode="EaseInOut"/>
                                        </EasingColorKeyFrame.EasingFunction>
                                    </EasingColorKeyFrame>
                                </ColorAnimationUsingKeyFrames>
                            </Storyboard>
                        </VisualState>
                        <VisualState x:Name="MouseOver">
                            <Storyboard>
                                <ColorAnimationUsingKeyFrames Storyboard.TargetProperty="(Panel.Background).(SolidColorBrush.Color)" Storyboard.TargetName="border">
                                    <EasingColorKeyFrame KeyTime="0:0:0.3" Value="#FF59B1EB">
                                        <EasingColorKeyFrame.EasingFunction>
                                            <CubicEase EasingMode="EaseInOut"/>
                                        </EasingColorKeyFrame.EasingFunction>
                                    </EasingColorKeyFrame>
                                </ColorAnimationUsingKeyFrames>
                            </Storyboard>
                        </VisualState>
                        <VisualState x:Name="Pressed">
                            <Storyboard>
                                <ColorAnimationUsingKeyFrames Storyboard.TargetProperty="(Panel.Background).(SolidColorBrush.Color)" Storyboard.TargetName="border">
                                    <EasingColorKeyFrame KeyTime="0:0:0.3" Value="#FF438CBB">
                                        <EasingColorKeyFrame.EasingFunction>
                                            <CubicEase EasingMode="EaseInOut"/>
                                        </EasingColorKeyFrame.EasingFunction>
                                    </EasingColorKeyFrame>
                                </ColorAnimationUsingKeyFrames>
                            </Storyboard>
                        </VisualState>
                        <VisualState x:Name="Disabled"/>
                    </VisualStateGroup>
                </VisualStateManager.VisualStateGroups>
                <ContentPresenter TextBlock.Foreground="White" HorizontalAlignment="Center" VerticalAlignment="Center"/>
            </Border>
        </ControlTemplate>
    </Window.Resources>
    <WrapPanel>
        <WrapPanel.Resources>
            <Style TargetType="{x:Type Button}">
                <Setter Property="Margin" Value="20" />
                <Setter Property="Width" Value="100" />
                <Setter Property="Height" Value="35" />
            </Style>
        </WrapPanel.Resources>
        <Button Content="Button" Template="{DynamicResource ButtonControlTemplate1}" />
    </WrapPanel>
</Window>
気が向いたら続きます。


